These Help pages are for a new version of the iRecord spreadsheet importer that we made available on 8 August 2024. Please let us know ([email protected]) if you have any corrections to add, or encounter any difficulties.
If you have wildlife records stored in a spreadsheet it is possible to import them into iRecord if you wish to do so, as an alternative to entering them directly onto the iRecord website or app.
Before you start
iRecord can be contacted via [email protected] |
Your spreadsheet
iRecord can import records from Excel spreadsheets (.xls or .xlsx), or from comma-separated text files (.csv). If you import from an Excel spreadsheet, only the first worksheet will be imported. (It is also possible to import Excel files or .csv files that are within a .zip archive.)
Your spreadsheet needs to have a single row per record, with column headings given in the first row. The minimum requirement is to have at least five columns to show the species name; the grid reference; the date; the recorder (name of the person who made the record); and the stage of the species (i.e. "adult", "larva", or use "not recorded" - see below for more details). Although not essential, we strongly recommend that you also include a column for the location name (which should ideally be a name from an Ordnance Survey map, or the recognised name of a nature reserve; for private garden locations we recommend using the name of the city, town or village, perhaps giving the street name as well, but not a full address.
You can add extra columns as well. For example, it is often useful to know how many of each species was seen, and if someone other than the recorder was was responsible for identifying the species then their name should be added in a column for the determiner (= "Identified by"). It doesn't matter what words you use for your column headings, as long as you are clear what each column means – you can match your column headings to iRecord’s equivalent during the import (see step 4 below).
A typical spreadsheet set-up might look like this:
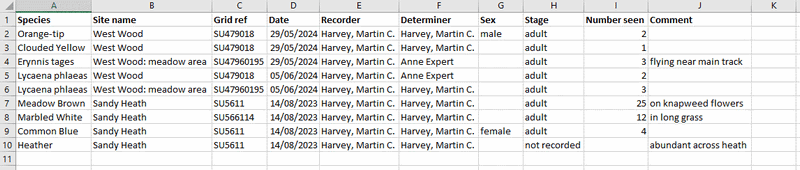
Make sure that the first row of your spreadsheet contains the column headings – don’t put a title or any other information above the headings row. The set of records should all be in one block, with no empty rows or columns within the data, and no additional information after the end of the rows of data.
Some of the columns will only import if their contents match what iRecord is expecting. For instance, the species names can be scientific or English names, but they have to match the names that iRecord uses, which are taken from the UK Species Inventory. If possible it is best to use scientific names, as these are likely to match the UKSI most consistently, but English names can be used instead, or you can have a mix of scientific and English names in one column.
Some of the other columns such as Stage and Sex also have to match a predefined set of terms – see Termlists for importing records.
Doing a test import
Once you commit to importing your records (at the end of step 5 below) there is no turning back! If you are not confident of using the importer, it can be helpful to do a test import before doing it for real. To do a test you need to put your iRecord account into “training mode”.
Once you have set your account to training mode, any records that you import will only be saved as training records, and will not be shared with verifiers. Once you are happy with how the import process works you can take your iRecord account back out of training mode and do the import again for real.
3. Importing into iRecord
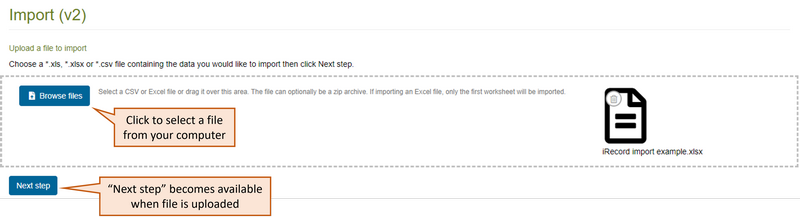
Step1: Choose a file to import. Log on to iRecord and go to the spreadsheet import page. (If you regularly import records from recorders other than yourself see also "Imports and iRecord accounts".) Click on “Browse files” and tell iRecord where your spreadsheet or csv file is saved on your computer, and then click on “Upload” to start the import process. Once your file has uploaded you can click on "Next step".
Step 2: Import settings. On the next page you need to specify which “Survey dataset” you want to import your records into, by selecting from the dropdown list. In most cases you should choose “iRecord Import” unless you have a specific need to use a different Survey. (If you do need to use one of the other surveys that lnk to iRecord you can click on the "Show all options" button to see the full list – if in doubt about which Survey to use contact iRecord.)
You then need to choose a "Spatial ref. system". The options most frequently used are shown in the dropdown, but other spatial reference systems can be used, via the "Show all options" button.
Also on this page you need to choose the “Species list” that you will be using – for standard records you should always use “UK Master List” (other options can be seen via the "Show all options" button, but these are unlikely to be needed for normal biological records).
Once you have set all three choices, click on "Next step".
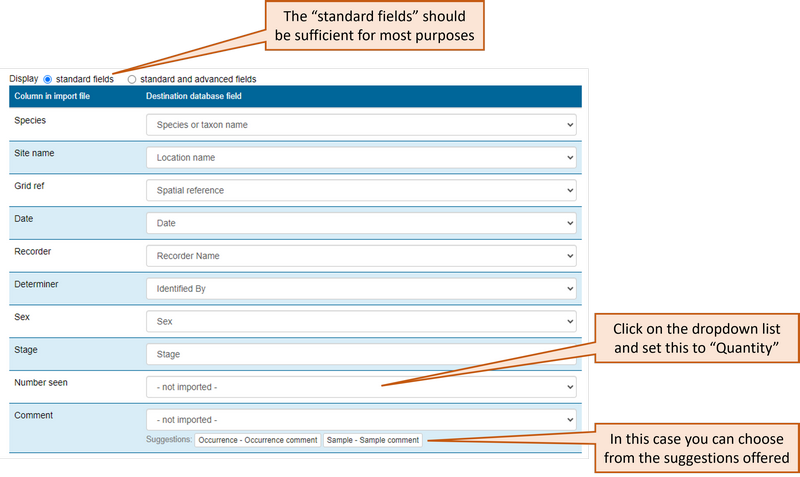
Step 3: Map the spreadsheet columns to the iRecord fields. The column headings from your spreadsheet file are shown on the left of this page, and you have to tell iRecord how to match your headings to the choices from the dropdown lists under “Destination database field”. iRecord will try to automatically match as many columns as it can, and it is best to check that the suggested matches are correct. For any columns that iRecord can't match automatically it will initially set them to be "not imported". You can then choose which field to import into, or leave it set to "not imported" if there is no available matching field.
By default the list of database fields shown will be the "standard fields". Additional fields can be displayed by switching to "standard and advanced fields", but note that some of the "advanced" fields may be difficult to interpret and may not be suitable be the data you are importing. If in doubt contact iRecord for further advice. (A full list of the "standard and advanced fields" is available here.)
As long as all five of the required fields have been mapped, you will then be able to click on "Next step".
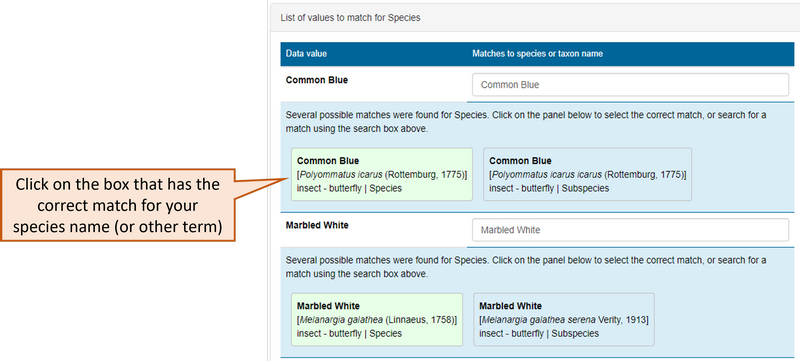
Step 4: Value matching. Some columns have to contain values that match to lists within iRecord, the main example being the species names. iRecord will attempt to match the names that you have supplied, but if any fail to match, or match to more than one possible term, they will be displayed on this "Value matching" page. You need to click on the correct matching values, and then save your choices, after which you can click on the "Next step" button.
Step 5: Import summary, and start the import. This page shows a summary of all the columns that you are importing, and how they are being matched to the iRecord fields. Check that the matches are as you expect - if any are incorrect, you will need to go back to Step 3.
At the foot of this page there are two optional boxes that you can fill in if required. The first allows you to add some metadata text that can explain what your import consists of. For instance, you may be importing records from a particular survey project that you wish to refer to, and you could add the data on which you are doing the import.
The second allows you to save your import settings as a template that can be used in future to import records that have the same spreadsheet structure.
When ready, you can click on the button at the foot of the page to "Start importing records". Once this button has been clicked the records will be imported - there is no undo option.
Step 6: Results of the import. Depending on the size of the file that you are importing, it can take some time for the records to be imported. If all goes well, you will see a message at the end that says "The import is complete".
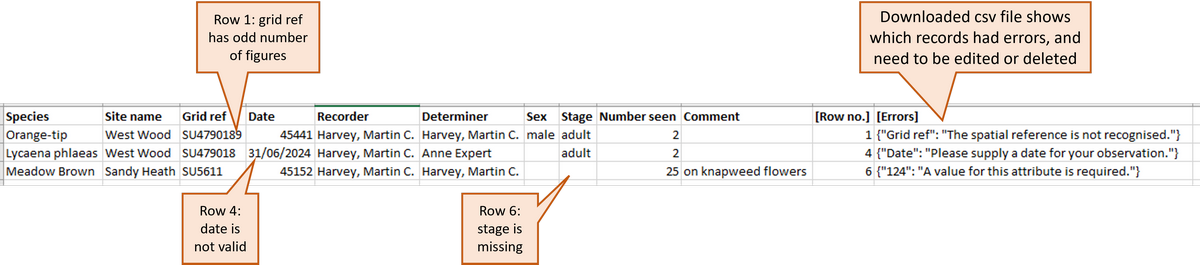
If the import process encounters any records that cannot be imported, you will see a message telling you how many records had problems, and there will be a button "Download the rows that had errors". Click on that button and you will be able to download a csv file that shows the records that caused problems, including extra column that gives details of what the errors were. Examples of errors that would cause the import to fail are incorrectly formatted grid references, or incorrect dates (such as 31 June 2024, which doesn't exist), or missing information in one of the required fields (e.g. if a stage term has been left blank, rather than being set to "not recorded").
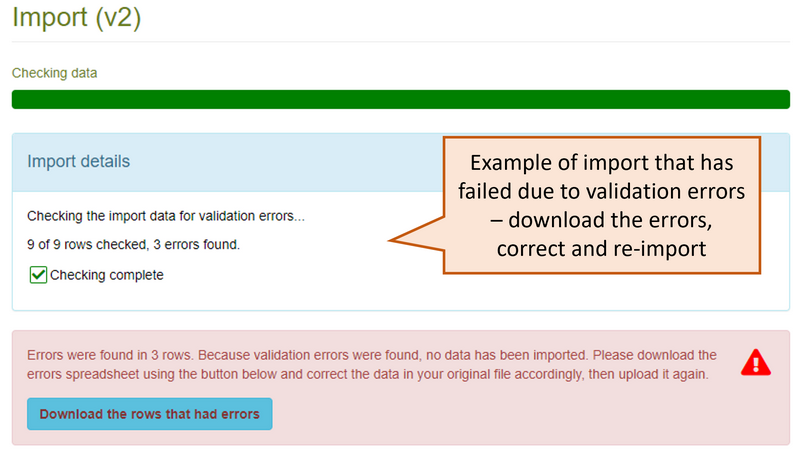
If one or more records fails to import, this will mean that the entire file is rejected - no records will be imported at all. If this happens you will need to go back to your original spreadsheet, correct the records that failed (or delete them altogether), and then import the entire spreadsheet again.