iRecord makes it easy to manage the records you collect for a bioblitz or any other recording event through its Activities page. Activities can be found under the Record menu item and allow you to bring the records together into one place that were collected for a particular purpose such as local bioblitzes or national events, a local recording group or even to identify the records collected for a national recording scheme. See also how to join an existing Activity, and how to set up a new Activity (but if you want an Activity for bioblitz purposes please stay on this page!).
Some key features of activities in iRecord are:
- Activities have a list of members. The administrator of the activity can decide whether participants can sign up without approval, need approval to sign up, or can sign up by invite only.
- Activities can have a filter which defines the type of record that are of interest. For example, an activity might be restricted to a geographical location and/or records on a given date. Some activities have no filter, for example the Pan Species Listers group which involves all records from the UK for iRecorders who compile a pan-list.
- Activities can have a list of associated recording forms and reports. A bioblitz might have a summary page report showing the total species count, whilst a recording scheme activity might have a recording form associated with it that captures records in the format preferred by that scheme (see the British Dragonfly Society recording group for an example).
- A public activity can have a URL which can be given out to allow people to easily join in with the activity. So, you could publish an address for your bioblitz and then people clicking the link would be guided through the process of signing up for iRecord and joining the activity. The administrators of the activity can also send out invitation emails.
Joining activities
When you first visit the Activities page and have not yet signed up for anything you will be taken straight to the “Browse all Activities” tab. This is a list of all the activities on iRecord which are available for you to sign up to, either with or without admin approval. The activities here include activities created by the administrators of iRecord as well as activities added to the system by any iRecord user wishing to do so. Some activities allow you to take part without signing up, for example one-off visitors to Burton Bradstock in Dorset can add records without becoming a member of the activity. Simply click the star icon next to the activities you want to join up to. If the group allows you to sign up without approval then you’ll be added straight to the activity’s list of members and taken to a page allowing you to access the various forms and reports that are available for the activity:
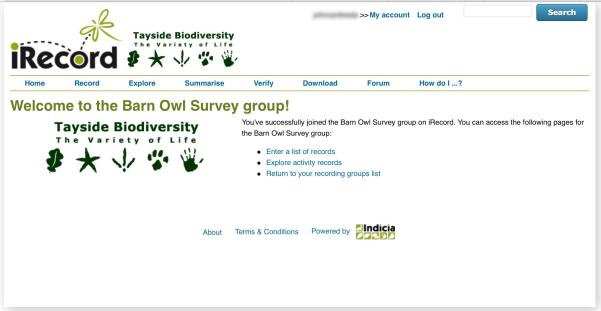
Alternatively, for other activities you'll be added to a list of members awaiting approval by the administrator.
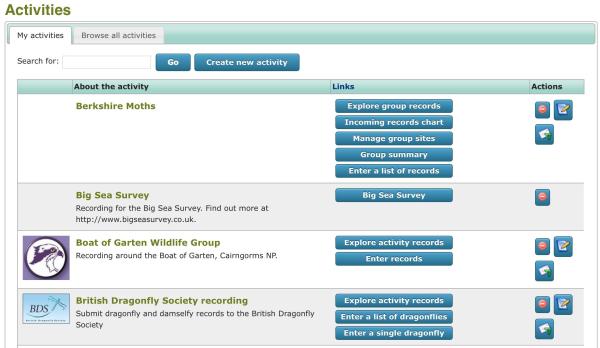
Once you’ve signed up for some activities, the My Activities tab on the Activities page will list them along with quick links to the various relevant forms and reports.
Creating your own activity
In order to run your bioblitz on iRecord, you’ll want to create an activity of your own, then invite participants to join or allow them to sign themselves up. Here are the suggested steps to allow you to do this:
- Go to the Activities page (Record > Activities on the menu).
- On the My Activities tab, click the Create New Activity button. This takes you to the Create or edit an activity page.
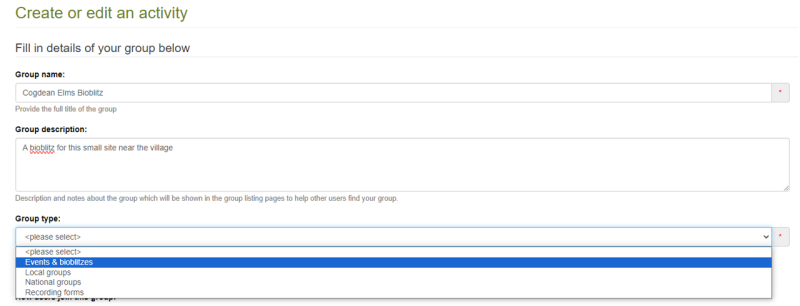
- Give your activity a name (e.g. Cogdean Elms Bioblitz) and a description to help potential participants understand what they are signing up to.
For Activity Type, select "Events & bioblitzes".
- If you have a logo for the activity then you can upload it by clicking on the Choose File button. You want to select a JPG or PNG file and the file will be resized to fit on the pages where it is shown, but if you make the logo between 100 and 200 pixels in each dimension then that will be ideal. You don’t need to upload a logo if you don’t have a suitable file though.
For the “How users join this activity” option, you need to decide if you would like to allow anyone to join in (fully public), or for new members to require your approval (public with moderation), or if the members must be invited to join in (private). As this is a public bioblitz we are going to select the option “Any iRecord user can join without needing approval”. Note that even if you make your activity membership private, the activity’s records will remain visible on the public reports in iRecord.

- The “Activity active from” and “to” input boxes allow you to define a “shelf life” for the activity. Some activities don’t have date constraints, but for an event based activity you might want the activity to expire from the list of activities available for people to join. Our example activity will occur on the 1st October 2023 and we’d like to allow 1 month after the date for all the records to be collected, so it makes sense to set the end date to 31st October 2023 using the popup date picker which appears when you click in the box.
The final input control in this section is the “Activity administrators”. This allows you to search for other iRecord users who you would like to have administration rights to the activity. Administrators are able to approve membership requests, send out invites and edit other details of the activity via additional links in the “Actions” column on the list of activities. As the activity creator you will automatically be made an administrator but if you need to add additional administrators, search for them using “surname, first name” format, select them then click Add.

The next section of the activity creation form allows you to specify a filter for the records to include in your activity. In our case we’d want to only include records within the bioblitz site’s boundary and on the date of the bioblitz. In other types of activity you might want to limit to a particular species group or a recording season. So, the next thing we need to do in this instance is to click on the Where panel. This pops up a box allowing you to define the boundary or grid reference of the site or to select an existing site boundary (including those which you’ve already defined under “My Sites”). To draw the site boundary, select the Draw Polygon tool on the map, then click on each point around the boundary of the site. Once the site is drawn double click to finish. If you make a mistake you can use the Reset button on the map to clear it, or click the Edit Polygon button then click on your boundary to enable drag handles allowing you to correct mistakes. Once your site boundary has been added to the map click the Apply button.
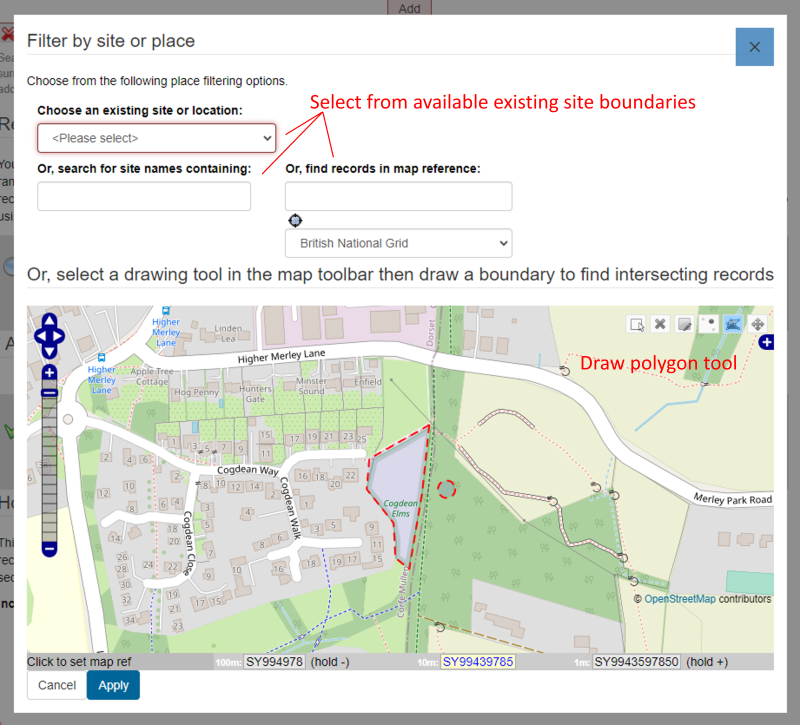
TIP: to get the map into the right region for you to draw the site boundary, you can enter the approximate grid reference of the site in the ‘find records in map reference’ box. Then, click on the Draw Polygon tool button on the map and draw your site to overwrite the grid reference.
We now need to set the date of our bioblitz in the filter. Click the When panel and the date box will popup. Use the popup date pickers to enter the date of your bioblitz as both the from and to dates. That means any record from other dates will be excluded - note that the date of recording in the field will be used, not the date of entry.
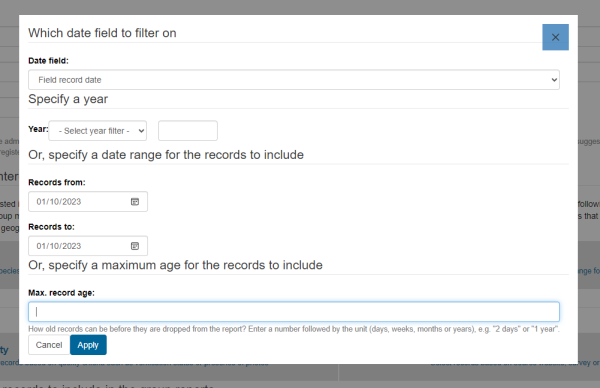
- The next section of the activity creation form allows you to fine tune how iRecord will decide which records get included on your activity’s reports. I’ve selected the first option which is the default option. It’s perhaps best to explain why I chose this by means of an example. Let’s say that a dog walker walks through your bioblitz boundary early in the morning before the bioblitz starts. They observe a song thrush and as they use iRecord, they record it. Later on, someone attends the bioblitz and records a common blue butterfly. Although they’ve joined the activity, when they submit the record, they forget to go via the link in their list of activities and just add the record to one of the default recording forms. A third person who is attending the bioblitz and signed up for the activity records a banded demoiselle on a pond which is just outside the site boundary on their way home. The record is given a 100m grid square which overlaps the bioblitz boundary. There are 3 options available to you for how to handle these cases:So, in my case I decided that I'd prefer to be strict and only include records which are definitely part of the bioblitz.
- “They were posted by a group member and match the filter defined above and they were submitted via a activity data entry form”. With this option selected, which is the default, records are only included on the reports if they came via a recording form linked to your activity. Therefore the song thrush, common blue butterfly and banded demoiselle will all be excluded.
- “They were posted by a group member and match the filter defined above, but it doesn't matter which recording form was used”. With this option selected, the song thrush record is excluded because the dog walker was not signed up to the bioblitz. However the common blue butterfly will get included as will the banded demoiselle even though the latter was not really part of the bioblitz.
- “They match the filter defined above but it doesn't matter who posted the record or via which form”. If this option is selected, all three records will overlap the bioblitz site boundary and fall on the right date, so all 3 will be included.
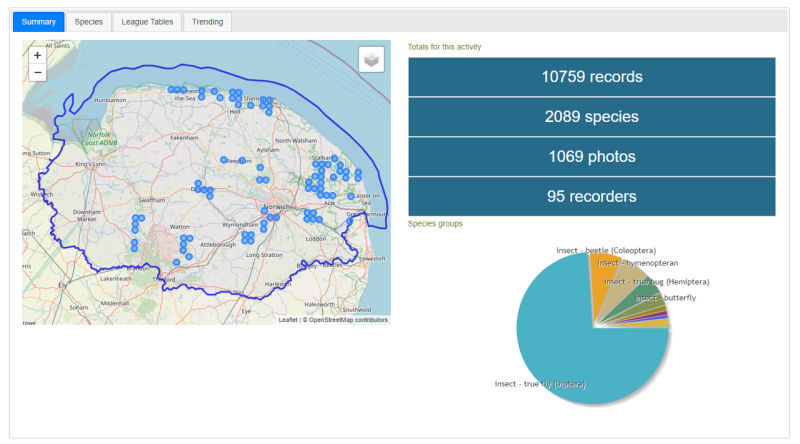
Finally, you need to decide which recording forms and reports to make available to members of your activity. The 2 default pages (which you can delete if needed) give you a basic general purpose list of records form and a filtered view of all the records, species and photos via iRecord’s “Explore” page. The Activity Summary page gives a nice overview of the information gathered during an event like a bioblitz so we are going to add that and set “Who can access the page?” to “Available to anyone”, so that it can be given out as a public link to anyone wishing to follow the bioblitz progress. We’ll also give the summary page a title that makes it clearer it relates to the bioblitz as it is a general purpose page.

This allows anyone to get a summary overview of the bioblitz, as shown in the following example:
- When you are done click the Create activity button.
Inviting participants
After creating your activity you will be taken to a page allowing you to send email invites to potential participants. You can specify a list of email addresses and amend the message to be sent as required, or just click Not Now if you don’t want to do this. Invitees will receive an email with a link to allow them to easily sign up.

You can send more invites later by clicking the Send invites button in the Actions column in your list of activities.
If you want to give out a public link to allow people to sign up (e.g. on your event’s publicity material) then you can construct the link required as follows:
- Take your activity’s title and convert it all to lower case.
- Remove everything except spaces and alphabetical or numeric characters.
- Replace all spaces with hyphens.
- Append this modified title to http://www.brc.ac.uk/irecord/join to create the joining link required.
So, as an example, if your activity was called “Surveying Tom & Jan’s field!” then the joining link would be http://www.brc.ac.uk/irecord/join/surveying-tom--jans-field.
Finally...
Find out more about bioblitzes in the UK and how to run your own at www.bioblitzuk.org.uk.
