By default the grid displays only those records that have not yet been verified. You can use the filter settings to change this if you want to see the records that have already been verified (see Filtering records in the grid). This page explains the verious elements on the verificaiton grid:
- Verification filter
- Sorting the grid
- Controlling which columns appear in the grid
- Column headings
- Grid controls for number of records
- Photo thumbnails
Verification filter
When you become a verififer the iRecrod admin team will assign you one or more filter, based on your area of expertise, geograpic area, or whatever other variables are agreed with you and the recording scheme organisers. If you have more than one verification role within iRecord, you will be able to choose the appropriate set of records from the Context dropdown:

Sorting the grid
By default the grid is sorted by record ID number, with the most recently added records at the top, but you can change the sorting by clicking on the small up/down arrows next to any of the column headings:

Controlling which columns appear in the grid
At the top-right of the grid are three control buttons:

These three buttons are:
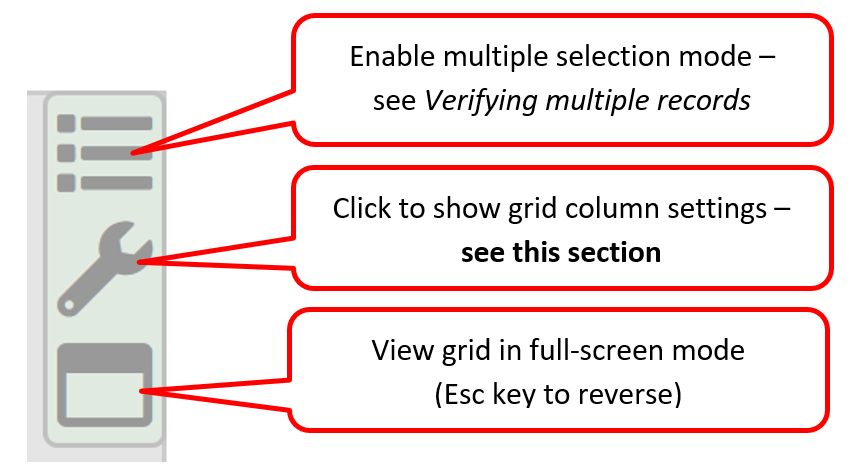
The first button to enable multiple selection mode comes into play for verifying multiple records (see page on verifying multiple records). The third button is not yet fully functional and can be ignored for now. This section concentrates on the second button – the spanner icon.
If you click on the spanner icon a list opens up. This is a long list of all the possible columns that could be displayed in the grid, with tick-boxes to select the columns you want. If you ticked all these columns you would end up with an impossibly congested grid! We recommend you scroll down the list and choose the set of columns that you find most helpful for display in the grid. Don’t forget that much of the information available in the columns is also available in the record details page to the right of the grid, so it’s best to only choose those columns in the grid that provide the main items that you need to verify, sort or filter the records.
You can also rearrange the order in which the columns appear. Click and drag any one of the listed columns, and you can move it to wherever you wish it to be in the sequence.
See also this video tutorial on the use of the grid column settings.
Once you have made your choices, click Save, or Cancel if you don’t wish to save, or Reset if you want to go back to the default view. If you do save a new set of columns the grid will reformat itself to the new set, and this set should reappear next time you visit the page.
Column headings
Most of the column headings should be self-explanatory, but here are some of the less obvious ones.
- ID: every record in the iRecord system has a unique ID number. You can use this number to sort the records (the higher the number the more recently the record was added), or to search for a particular record if you know its number.
- Src: abbreviation for “Source”. The numbers that are displayed in this column tell you which website/app/recording form was used to enter the record – hover over the numbers and you will see what the source is. The numbers have two parts: the number on the left of the bar is the website that the record originated from, and the number on the right of the bar is the survey within that website. Records added directly to iRecord will have the number “23” on the left. As another example, records from the SEWBReCord website “South-east Wales Biodiversity Records Centre) have the number “41” on the left.
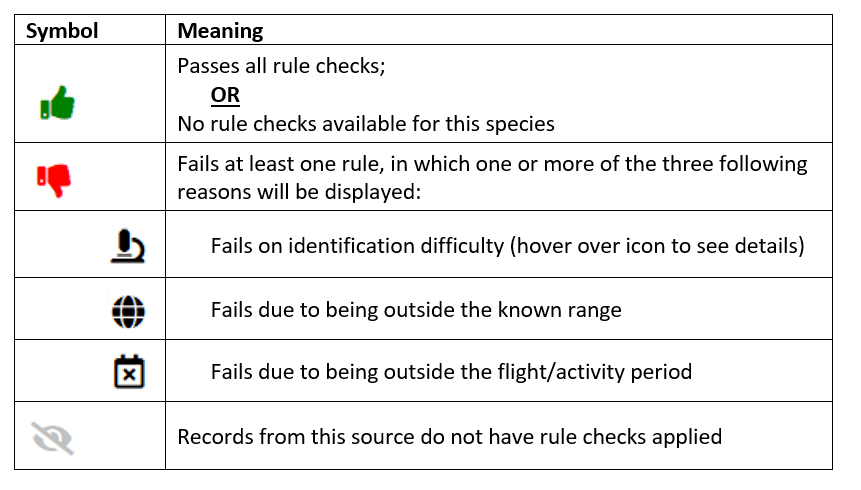
- Checks: these are the automatic checks that iRecord carries out for some species groups. Checks may be made on whether the species is considered hard to identify; whether it has been recorded within its known range; and whether it has been recorded within its usual flight/activity period. For more information on how the rules were derived see our auto-checks Help page. In this column you will see the following symbols.
Grid controls for number of records
The number of records in the current grid is shown at the bottom of the grid:
If there is a large number of records, you may wish to apply filters to prioritise which ones to verify in the time you have available (see page on Filtering records in the grid, for more on filtering).
Also at the bottom of the grid is a control for how many records you wish to display in the grid:
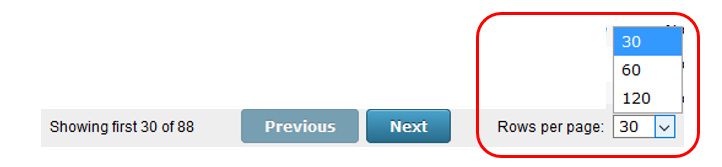
Photo thumbnails
If you have included the “Media” column in your verification grid you will see a thumbnail image for each photo that is attached to the records. If you click on the thumbnail image it will open up to a larger size, and if there is more than one photo for the record you will see arrow buttons on either side of the photo so you can scroll through to the next in the sequence, or if you prefer you can use the left or right arrow keys on your keyboard. To close the image you can either click on the close button at the top-right of the photo, or use the Escape key on your keyboard.
To see photos at the maximum available size use a right-click on the thumbnail image, instead of the normal left-click. From the right-click options, select ‘open link in new tab’ (or similar wording depending on your web browser). Note that this ‘maximum’ size photo is up to 1500 pixels square, and the recorder’s original photo may be larger again – contact the recorder if you need to see the photo at its full original resolution.